浏览模式: 标准 | 列表分类:Javascript
Submitted by gouki on 2008, November 25, 9:07 AM
以前用JS操作XML都是用DOM的方式,现在有了这个插件,操作起来会更方便了直接采用对象。。。
来源:http://www.94this.com.cn/article/258.htm
这个插件应该是比较方便的一个插件了,它能把xml字符串或xml文件转化为json对象,比如把
XML/HTML代码
- <xml>
- <message>Hello world</message>
- </xml>
转化为
JavaScript代码
- {
- message: 'Hello world';
- }
这样我们操作起来就很方便了,因为用javascript操作json比操作xml要方便好多。
基本的使用:
JavaScript代码
- var xml = '<xml><message>Hello world</message></xml>';
- var json = $.xml2json(xml);
- alert(json.message);
当然它也能通过直接把xml文件转化为json:
JavaScript代码
- $.get('data/hello.xml', function(xml){
- var json = $.xml2json(xml);
- alert(json.message);
- });
好了,看看基本的演示吧!(膘叔:演示地址仍然是亮亮的网站)
这个插件还有一个扩展的用法:
基本的是把
XML/HTML代码
- <?xml version="1.0" encoding="utf-8"?>
- <animals>
- <dog color='Black'>
- <name>Rufus</name>
- <breed>labrador</breed>
- </dog>
- <dog breed='whippet'>
- Adopted
- <name>Marty</name>
- </dog>
- <cat color="White">
- <name>Matilda</name>
- </cat>
- </animals>
转化为
JavaScript代码
- {
- dog:[
- { name:'Rufus', breed:'labrador', color:'Black' },
- { text:'Adopted', name:'Marty', breed:'whippet' }
- ],
- cat:{ name:'Matilda', color:'White'}
- }
扩展的作用是把每个节点转化为数组的形式,即
JavaScript代码
- {
- dog:[
- { name:['Rufus'], breed:['labrador'], color:'Black' },
- { text:'Adopted', name:['Marty'], breed:'whippet' }
- ],
- cat:[
- { name:'Matilda', color:'White'}
- ]
- }
这个使用也简单,就多了一个参数:
JavaScript代码
- $.get('data/animals.xml', function(xml){
- var animals = $.xml2json(xml, true);
- alert(animals.dog[1].name[0].text +'/'+ animals.dog[1].text);
- });
最后,看看所有用法的
演示(
此演示官方提供)吧!
Javascript | 评论:0
| 阅读:23384
Submitted by gouki on 2008, November 16, 6:02 PM
經過指點,獲悉原文為:http://www.felixwoo.com/archives/247
我轉貼的文章來源:http://www.knowsky.com/442121.html
PS:虽然我是从上面拷来的,但我并不建议打开这个网页看,因为,上面全是广告。个人猜测,代码也是他拷来的,但没有亲自验证,我也没法打包票。不过东西有点用,所以我也就COPY过来了。
内容如下:
最近在网上查阅了不少Javascript闭包(closure)相关的资料,写的大多是非常的学术和专业。对于初学者来说别说理解闭包了,就连文字叙述都很难看懂。撰写此文的目的就是用最通俗的文字揭开Javascript闭包的真实面目。
一、什么是闭包?
“官方”的解释是:所谓“闭包”,指的是一个拥有许多变量和绑定了这些变量的环境的表达式(通常是一个函数),因而这些变量也是该表达式的一部分。
相信很少有人能直接看懂这句话,因为他描述的太学术。我想用如何在Javascript中创建一个闭包来告诉你什么是闭包,因为跳过闭包的创建过程直接理解闭包的定义是非常困难的。看下面这段代码:
JavaScript代码
- function a(){
- var i=0;
- function b(){
- alert(++i);
- }
- return b;
- }
- var c = a();
- c();
这段代码有两个特点:
1、函数b嵌套在函数a内部;
2、函数a返回函数b。
这样在执行完var c=a()后,变量c实际上是指向了函数b,再执行c()后就会弹出一个窗口显示i的值(第一次为1)。这段代码其实就创建了一个闭包,为什么?因为函数a外的变量c引用了函数a内的函数b,就是说:
当函数a的内部函数b被函数a外的一个变量引用的时候,就创建了一个闭包。
我猜想你一定还是不理解闭包,因为你不知道闭包有什么作用,下面让我们继续探索。
二、闭包有什么作用?
简而言之,闭包的作用就是在a执行完并返回后,闭包使得Javascript的垃圾回收机制GC不会收回a所占用的资源,因为a的内部函数b的执行需要依赖a中的变量。这是对闭包作用的非常直白的描述,不专业也不严谨,但大概意思就是这样,理解闭包需要循序渐进的过程。
在上面的例子中,由于闭包的存在使得函数a返回后,a中的i始终存在,这样每次执行c(),i都是自加1后alert出i的值。
那 么我们来想象另一种情况,如果a返回的不是函数b,情况就完全不同了。因为a执行完后,b没有被返回给a的外界,只是被a所引用,而此时a也只会被b引 用,因此函数a和b互相引用但又不被外界打扰(被外界引用),函数a和b就会被GC回收。(关于Javascript的垃圾回收机制将在后面详细介绍)
三、闭包内的微观世界
如 果要更加深入的了解闭包以及函数a和嵌套函数b的关系,我们需要引入另外几个概念:函数的执行环境(excution context)、活动对象(call object)、作用域(scope)、作用域链(scope chain)。以函数a从定义到执行的过程为例阐述这几个概念。
1、当定义函数a的时候,js解释器会将函数a的作用域链(scope chain)设置为定义a时a所在的“环境”,如果a是一个全局函数,则scope chain中只有window对象。
2、当函数a执行的时候,a会进入相应的执行环境(excution context)。
3、在创建执行环境的过程中,首先会为a添加一个scope属性,即a的作用域,其值就为第1步中的scope chain。即a.scope=a的作用域链。
4、 然后执行环境会创建一个活动对象(call object)。活动对象也是一个拥有属性的对象,但它不具有原型而且不能通过JavaScript代码直接访问。创建完活动对象后,把活动对象添加到a 的作用域链的最顶端。此时a的作用域链包含了两个对象:a的活动对象和window对象。
5、下一步是在活动对象上添加一个arguments属性,它保存着调用函数a时所传递的参数。
6、最后把所有函数a的形参和内部的函数b的引用也添加到a的活动对象上。在这一步中,完成了函数b的的定义,因此如同第3步,函数b的作用域链被设置为b所被定义的环境,即a的作用域。
到此,整个函数a从定义到执行的步骤就完成了。此时a返回函数b的引用给c,又函数b的作用域链包含了对函数a的活动对象的引用,也就是说b可以访问到a中定义的所有变量和函数。函数b被c引用,函数b又依赖函数a,因此函数a在返回后不会被GC回收。
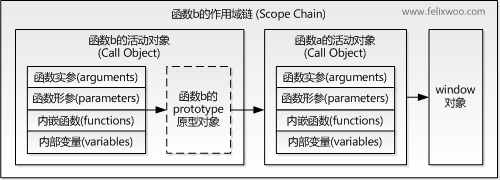
当函数b执行的时候亦会像以上步骤一样。因此,执行时b的作用域链包含了3个对象:b的活动对象、a的活动对象和window对象,如下图所示:(这里看了一下,确实没有图,看来果然是拷贝过来的,稍稍验证了我的说法,呵呵。。。。唉。可惜我确实不知道原文在哪里,不过,我是从他的网站拷来的,还是给他一个链接,毕竟我的资料来源是该网站)

(附上原文圖片)
如图所示,当在函数b中访问一个变量的时候,搜索顺序是先搜索自身的活动对象,如果存在则返回,如果不存在将继续搜索函数a的活动对象,依 次查找,直到找到为止。如果整个作用域链上都无法找到,则返回undefined。如果函数b存在prototype原型对象,则在查找完自身的活动对象 后先查找自身的原型对象,再继续查找。这就是Javascript中的变量查找机制。
四、闭包的应用场景
1、保护函数内的变量安全。以最开始的例子为例,函数a中i只有函数b才能访问,而无法通过其他途径访问到,因此保护了i的安全性。
2、在内存中维持一个变量。依然如前例,由于闭包,函数a中i的一直存在于内存中,因此每次执行c(),都会给i自加1。
以上两点是闭包最基本的应用场景,很多经典案例都源于此。
五、Javascript的垃圾回收机制
在Javascript中,如果一个对象不再被引用,那么这个对象就会被GC回收。如果两个对象互相引用,而不再被第3者所引用,那么这两个互相引用的对象也会被回收。因为函数a被b引用,b又被a外的c引用,这就是为什么函数a执行后不会被回收的原因。
Tags: 闭包, closure, javascript, archive
Javascript | 评论:2
| 阅读:26257
Submitted by gouki on 2008, November 14, 10:52 AM
demo地址:http://www.51toria.cn/demo/JQplus/jqzoom/
使用的JS:
页面调用方法:
JavaScript代码
- jQuery.noConflict();
- jQuery(document).ready(function(){
- $("img.jqzoom").jqueryzoom();
- });
Tags: jquery, plugins, jqzoom, javascript, demo
Javascript | 评论:3
| 阅读:30791
Submitted by gouki on 2008, September 30, 10:55 PM
关于new Date().getTime()的简写方式.
原文来自cssrain,只取了其中的一小部分。http://www.cssrain.cn/demo/3/newDate.html
小结:
(1)getTime(new Date.getTime 方法)
返回指定的 Date 对象自 1970 年 1 月 1 日午夜(通用时间)以来的毫秒数。当比较两个或更多个 Date 对象时,使用此方法表示某一特定时刻。
返回值类型:Number -- 一个整数。
(2)
function now(){
return +new Date;
}
jQuery 源代码里就是使用的 +new Date ;
(3)
用来判断 google 浏览器:
if( !isNaN(Date.parse("1970.01.01")) ){
alert("This is Google Chrome!");
}else{
alert("This is NOT!");
}
结果:1和2的结果是一样的。但这个number是13位的number,和PHP中的时间戳并非同一个意义
Tags: time, jquery, gettime, date
Javascript | 评论:0
| 阅读:26306
Submitted by gouki on 2008, September 29, 8:08 PM
微软和诺基亚正式宣布支持开源的 jQuery JavaScript库,另外,微软还称他们将把jQuery作为Visual Studio工具集的一部分。他将提供包括jQuery的智能提示,代码片段,示例,文档编制等内容在内的功能。微软和诺基亚将长期成为jQuery的用户成员,其他成员还有Google, Intel, IBM, Intuit, 路透社等。
Tags: javascript, jquery, microsoft, nokia, google
Javascript | 评论:0
| 阅读:25267


