最近,使用UBUNTU作为了我在单位的常用开发环境,虽然有时候还是不太习惯,但大多时间里我还是能够顺利的使用了。
比如,我的开发工具选择了Netbeans这个基于JAVA的IDE,他有一个好处就是跨平台,因此,在WIN用使用了它之后,到LINUX下再使用的时候,就很顺利了(而且MAC下面也有该软件,如果哪天我用MAC了,它也能用,HOHO)
浏览器,FIREFOX,这个就不多说了,反正我的插件和WIN下一样(fastdial,firefox sync,search status,firebug,firecookie,readitlater等),也没有什么不习惯的地方了。
没有editplus,但是有gedit。
邮件,没有foxmail,但是有很多类似的,比如thunderbird
FTP,我在win下用filezilla因此,UBUNTU下也可以用这个,很爽。
唯独几个不爽的就是IM了,都不太好用。MSN吧,不太好,GTALK算是比较正常的,QQ吧,问题多。。不得已,经用virtualBox装了一个虚拟机,里面跑起了XP,然后在里面跑QQ。。。(最主要的原因是WEBQQ和LINUXQQ不支持讨论组,而我们部门偷懒,没用架群,直接用讨论组了。。。)
再接下来不爽的就是,明明我smbmount开发机上共享的目录到本地的,但权限总是1002,除了root外无法更改。但是用GUI界面的:ConnectServer工具,就可以直接连接上(问题在于连接上后,找不到在映射在哪个目录下,无法直接用IDE打开了)
最后netbeans直接打开remote功能,本地保存代码的时候,自动提交到remote上去。至此,几乎没有不能完成的工作了。(好象除了网银等不支持外,其他都可以接受,以前的aliedit的xpi不支持了。。伤心,不过刚才试了一下建行的网行,用firefox顺利打开,可惜我建行里没钱,也没有开通更多功能,失败呀)
界面嘛,就是关闭在左边不太舒服,还好几乎所有的软件都支持ctrl+w(关闭),问题也就显得不那么明显了。当然也算是习惯一下,等哪天我用苹果的时候,就可以少习惯几天了。阿Q很开心
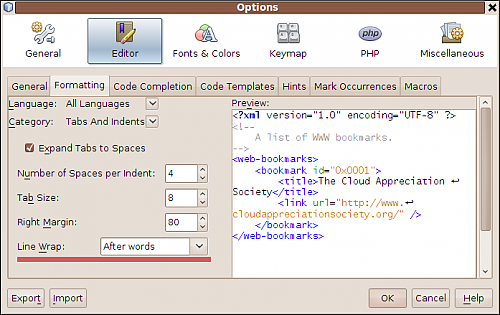
Ubuntu10的时候,如果你进行netbeans的安装(PHP版),你会发现,界面十分模糊,仿佛是英文缩小成了很小很小的一部分,但是,如果你create a project,你又发现,很多英文又显示得好好的。
怎么办?菜单英文全部不能显示正常,都是模糊的一团,如果你在win下操作熟练,你可以轻松的找到option菜单,但是即使你设置了标准 的dialog Input作为你的界面字体,菜单等仍然保持模糊状态。
查询了一下google,好象很多采用java的程序都有类似情况发生,所幸,netbeans可以通过netbeans.conf里地配置来进行处理,这时候,你可以打开/usr/local/netbeans xx.xx/conf/netbeans.conf,修改netbeans_default_options,在最后的一个选 项里加上:--laf com.sun.java.swing.plaf.nimbus.NimbusLookAndFeel,再进行重启。OK,菜单全部出现了,而且非常秀丽。
最后诉诉苦,为了安装ubuntu,我遇到了很多问题,比如我为了备份winodws盘里的数据,先用tar把数据简单的tar了一下(没有压缩,而且打包成一个文件,方便COPY),然后。。。先是昨天用网络进行COPY,25G的文件,COPY成了80多G还没有完事。今天上午用移动硬盘先COPY,但先忘了移动硬盘是fat32的,只能最大4G,在COPY到4G的时候出错了。然后格式化成NTFS,再继续拷贝,结果到22G的时候,移动硬盘过热,突然自己就断了,心啊,哇凉哇凉的。最后突然想起linux的操作可以用scp进行COPY,而且局域网里有linux系统,于是我用scp进行COPY,果然。半小时不到就COPY完了。等系统装完再Scp回来,真的很方便。
然后遇到的问题是smbmount,把linux通过samba共享出来的目录,用smbmount到本地,但会突然发现,用户组都变成了1102之类的,而且我在root权限下,无法chown该mount回来的目录。但root用户可以更改该目录下的数据,而默认用户无法修改,打开后保存的时候会造成数据丢失。郁闷。。。
目前用下来,装B很快乐。Over
今天下午在重装系统的时候,犯了一个小错误,结果,导致我的系统分区表全坏了。在UBUNTU下只能看到一个分区,里面的内容全部不见了。
所幸,UBUNTU可以光盘启动,这时候,我用它上网查了一些资料,发现原来testdisk这个软件不错,可以修复分区表的信息。
于是apt-get install testdisk,很快就下载回来了。
直接运行,会问你是否记录LOG,如果你没啥大事,就不用记录了啦,然后选择INTEL PC,再选择优化,发现了自己的系统硬盘终于被认了出来,灰常激动啊。
把分区表写入硬盘后,可以在LINUX下面发现已经挂载到/media目录下了,立刻,远程到局域网,把数据全部拷贝到局域网中。
期间,本来是想用smbmount把远程的共享目录映射过来,然后把本地内容拷贝过去,结果发现好象不行。最后没辙,只能远程,把本地磁盘映射到远程系统中,终于可以拷贝内容了。
激动啊。。。不然我就全完了
如果你是VPS,又不太会配置系统,那么这个选择就挺不错的。。LNMP一键安装包,一下子就把所有的东西全部安装回来了,而且每增加一个域名之类的都不算特别难,当然前提是你最起码得懂一点点linux的操作,比如你会使用ssh,那样,你在vps下就能很方便的操作了(我今天操作了一次,只是安装的时候非常长,还好,国外的VPS速度很快,就是编译时间长了一点)
来吧,看步骤和内容吧。
系统需求:
需要2 GB硬盘剩余空间
128M以上内存
安装步骤:
1、下载LNMP一键安装包:
可以选择使用下载版(推荐国外或者美国VPS使用)或者完整版(推荐国内VPS使用),如果使用下载版执行命令 wget -c http://soft.vpser.net/lnmp/lnmp0.5.tar.gz,如果使用完整版,执行命令 wget -c http://soft.vpser.net/lnmp/lnmp0.5-full.tar.gz,执行上述命令后LNMP一键安装包就会被下载到VPS上。
2、解压LNMP一键安装包:
执行tar zxvf lnmp0.5.tar.gz 或者tar zxvf lnmp0.5-full.tar.gz 就会将LNMP一键安装包解压缩。
3、CentOS下安装步骤
下载版执行命令 cd lnmp0.5/ ,完整版执行命令:cd lnmp0.5-full/
然后再执行./centos.sh ,输入要绑定的域名,回车,再输入要设置的MySQL root的密码,再次回车确认。程序会自动安装编译Nginx、PHP、MySQL、phpMyAdmin、Zend这几个软件。
4、Debian/Ubuntu下安装步骤
下载版执行命令 cd lnmp0.5/ ,完整版执行命令:cd lnmp0.5-full/
然后32位系统执行./debian.sh ,输入要绑定的域名,回车,再次输入VPS/服务器所在位置:asia、 america、europe、oceania或africa,回车,再输入要设置的MySQL root的密码,回车后,再次回车确认。程序会自动安装编译Nginx、PHP、MySQL、phpMyAdmin、Zend这几个软件。安装大约10分 钟左右需要设置MySQL root用户的密码。
安装其他组件
1、安装eAccelerator,执行如下命令:./eaccelerator.sh 就会自动安装并重启web服务。
2、安装ionCube,执行如下命令:./ionCube.sh 就会自动安装并重启web服务。
3、安装PureFTPd和管理面板,执行如下命令:./pureftpd.sh 就会自动安装PureFTPd,安装完PureFTPd,需要在浏览器执行http://你的域名或IP/ftp/install.php 安装PureFTPd用户管理。详细教程参考:http://www.vpser.net/manage/lnmp-pureftpd-cp.html
4、安装VsFTPD,执行如下命令:./vsftpd.sh 就会自动安装上vsftpd,只需要执行命令:useradd -d /home/wwwroot -s /sbin/nologin adminftp 添加上帐号指定好ftp帐号的根目录,再执行:passwd adminftp 设置上密码,登录就可以了。
虚拟主机管理
1、添加虚拟主机,执行如下命令:/root/vhost.sh 根据提示输入要绑定的域名,回车,如果需要添加更多的域名,输入y,再输入要另外绑定的域名,多个域名可以用空格隔开。再输入域名绑定的目录(绝对目录, 如/home/wwwroot/lnmp,如果不填默认是/home/wwwroot/绑定的域名),再选择是否添加伪静态规则,默认已经有了 Discuz、Wordpress、Sablog、emlog、dabr,可直接输入以上名称即可,如果需要添加自定义伪静态规则,直接输入一个想要的名 字,程序会自动创建伪静态文件,直接在/usr/local/nginx/conf/你自定义的伪静态名字.conf 里面添加伪静态规则就行。接下来会提示是否需要启用日志功能,一般情况下不需要启动,直接输入n就行,如需启动,输入y,再输入要定义的日志文件名字,回 车就会自动添加虚拟主机。
2、状态管理及相关管理页面
LNMP状态管理: /root/lnmp {start|stop|reload|restart|kill|status}
PureFTPd状态管理 /root/pureftpd {start|stop|restart|kill|status}
phpinfo : http://前面输入的域名或IP/phpinfo.php
phpMyAdmin : http://前面输入的域名或IP/phpmyadmin/
探针 : http://前面输入的域名或IP/p.php
MySQL root密码:如果不输入直接回车为root,否则为你输入的密码。
LNMP相关目录:
mysql : /usr/local/mysql
php : /usr/local/php
nginx : /usr/local/nginx
网站目录: /home/wwwroot
注:已经在DiaHosting、PhotonVPS(感谢提供测试VPS)、RasHost、VPSYOU、VPS.net、breezehost、Rapidxen 及几位lnmp网友提供的VPS上的CentOS 32/64bit、Debian 4/5 32/64bit上测试成功。同时感谢提供测试VPS的商家及网友。
|
来源:http://lnmp.org/install.html
Since Apache is most of the time a memory hungy process, people started to look for different ways to host their website. Apache is clearly not the only webserver available. A few good examples are lighttpd and nginx. In this tutorial I will show you how to install it on your Ubuntu server. This tutorial also applies to Debian, though. There is only a very small difference.
Ready? Let's begin shall we.
Step 0 - Preliminary Notes
In order to complete this tutorial, I assume you have installed a base system of Debian or Ubuntu. How this can be done, can be read in different tutorials. This tutorial only focusses on getting nginx+php running without much hassle.
Step 1 - Nginx
Installing nginx is the first step we have to do. This can be easily done by downloading it from the repository.
XML/HTML代码
- sudo apt-get install nginx
The default vhost has to be changed in order to work properly.
XML/HTML代码
- sudo vim /etc/nginx/sites-available/default
A nice starting point for your config is:
XML/HTML代码
- server {
- listen 80;
- server_name localhost;
- access_log /var/log/nginx/localhost.access.log;
-
- ## Default location
- location / {
- root /var/www;
- index index.php;
- }
-
- ## Images and static content is treated different
- location ~* ^.+.(jpg|jpeg|gif|css|png|js|ico|xml)$ {
- access_log off;
- expires 30d;
- root /var/www;
- }
-
- ## Parse all .php file in the /var/www directory
- location ~ .php$ {
- fastcgi_split_path_info ^(.+\.php)(.*)$;
- fastcgi_pass backend;
- fastcgi_index index.php;
- fastcgi_param SCRIPT_FILENAME /var/www$fastcgi_script_name;
- include fastcgi_params;
- fastcgi_param QUERY_STRING $query_string;
- fastcgi_param REQUEST_METHOD $request_method;
- fastcgi_param CONTENT_TYPE $content_type;
- fastcgi_param CONTENT_LENGTH $content_length;
- fastcgi_intercept_errors on;
- fastcgi_ignore_client_abort off;
- fastcgi_connect_timeout 60;
- fastcgi_send_timeout 180;
- fastcgi_read_timeout 180;
- fastcgi_buffer_size 128k;
- fastcgi_buffers 4 256k;
- fastcgi_busy_buffers_size 256k;
- fastcgi_temp_file_write_size 256k;
- }
-
- ## Disable viewing .htaccess & .htpassword
- location ~ /\.ht {
- deny all;
- }
- }
- upstream backend {
- server 127.0.0.1:9000;
- }
k, we're done here. Now we'll install the needed files for PHP.
Step 2 - Installing PHP
Many sites rely on PHP for providing them dynamic content, whether this is a wiki, forum software, weblog or something entirely different.
If you are running Ubuntu, we first have to resolve two dependencies required for the dotdeb packages. If you are running the amd64 version, you should replace i386 with amd64.
For Debian you won't have to do this!
XML/HTML代码
- cd /tmp
-
- wget http://us.archive.ubuntu.com/ubuntu/pool/main/k/krb5/libkrb53_1.6.dfsg.4~beta1-5ubuntu2_i386.deb
-
- wget http://us.archive.ubuntu.com/ubuntu/pool/main/i/icu/libicu38_3.8-6ubuntu0.2_i386.deb
-
- sudo dpkg -i *.deb
Again, this is only required if you're on Ubuntu.
The rest of the tutorial applies to both Ubuntu & Debian.
We'll have to add the dotdeb repository to the APT sources, so we can use their packaged PHP 5.3 and php-fpm:
XML/HTML代码
- sudo echo "deb http://php53.dotdeb.org stable all" >> /etc/apt/sources.list
Update apt:
XML/HTML代码
- sudo apt-get update
The resulting text should include dotdeb.
Now we'll install PHP (part 1):
XML/HTML代码
- sudo apt-get install php5-cli php5-common php5-suhosin
We have to install the cli before the rest, because this will cause problems later on.
XML/HTML代码
- sudo apt-get install php5-fpm php5-cgi
If you are planning to use a database or require specific modules (mcrypt, ldap, snmp etc) you can install them as well.
Ok, so now we have nginx and PHP.
One minor remark: If you are using "php short tags" (<?) you should enable them in your php.ini files (for both fpm and cli). If you do not change this, you will see your code in plain text!
Step 3 - Finalizing
Restart nginx in order to catch up with the config changes we made earlier.
XML/HTML代码
- sudo /etc/init.d/nginx restart
The restart should have gone without any problems.
After installing php5-fpm, it should have been started. If you did change your php.ini files, you have to restart php5-fpm.
XML/HTML代码
- sudo /etc/init.d/php5-fpm restart
All right. They should now both be running.
Step 4 - Testing
In order to test if the execution of PHP is working, create an index.php file in /var/www with the following content:
PHP代码
- <?php phpinfo(); ?>
Visit your webserver and you should be able to see the generated phpinfo. If not, something went wrong.
Step 5 - Troubleshooting & Final notes
If you did not see the phpinfo, there might be something wrong. In order to track down what went wrong, you can check the nginx error log:
XML/HTML代码
- sudo tail /var/log/nginx/error.log
Remember, if you did change your php.ini you have to restart php5-fpm. Restarting nginx isn't' necessary.
In my example config I've enabled the fastcgi error interception. If a serious error occurs (for instance a "cannot redeclare class xyz"), nginx can catch this page and show a "nice" error page that something went wrong. This way, there is less information given out in case something is going seriously wrong.
If you do not like this, you can turn it off.
If php5-fpm is not running, your PHP files cannot be parsed and nginx will show the user an error page.
Well, I guess we're done and you are now able to serve PHP with your new nginx based webserver. Nginx is pretty nice and you can configure a lot. If you need rewrites, be aware that nginx does not work with .htaccess files. You will need to change your vhost settings in order for the rewrites to work.
原文地址为:http://www.howtoforge.com/installing-php-5.3-nginx-and-php-fpm-on-ubuntu-debian
事实上,如果你真的按照本文所说的去安装,好象是不能成功的。好象默认nginx不在ubuntu的包里。
原文中还有三篇相关文章,如果有兴趣,可以看一下:
有些东西还是可以看看的,但如果是纯操作没有讲解,其实意义不大,终究只是知其然不知其所以然