先不说什么功能,只能说这种功能对我们来说太有用了。
refactor,这种重构,其实在ZS和NETBEANS 中效果并没有现在这个软件(phpstorm)那么明显。看看它的功能就知道了。
官方网址(http://blog.jetbrains.com/webide/2011/05/extract-function-method-refactoring-for-php/)说:
We are working hard on new features for PhpStorm 2.1, and the ‘Extract Function/Method’ refactoring for PHP is one of them. This feature has been available since the first PhpStorm 2.1 EAP(106.444), and we are looking forward for your feedback.

Picture 1b: Select an expression

Invoke the refactoring from the menu ‘Refactor -> Extract Method‘ or using a hotkey. The default hotkey is Ctrl+Alt+M for Windows/Linux and Cmd+Opt+M for Mac.
Depending on the context of the selected code fragment, ‘Extract method’ (the code fragment is inside a method) (Picture 2b) or ‘Extract Function’(the code fragment is inside a function or script) (Picture 2a).
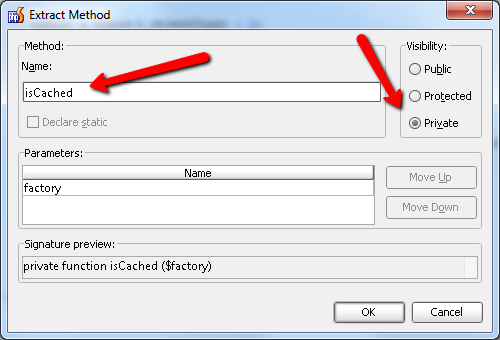
Picture 2a: ‘Extract Function’ dialog

Picture 2b: ‘Extract Method’ dialog

Enter the name of the new function/method. Press OK.
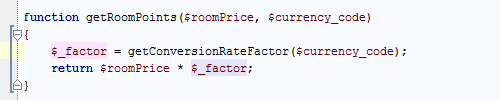
Picture 3a: The code fragment is replaced with a function call statement

Picture 3b: The expression is replaced with a method call expression

Picture 4a: Definition of the extracted function

Picture 4b: Definition of the extracted method

Develop with pleasure!
------------
看完上面的内容,你是否觉 得,原来重构也可以这样简单?
如果到facebook上关注一下yii framework的群组,会发现有人在介绍yiicookbook.org,里面是一本关于1.1的书。
然后去yii framework官方上搜索一下phpstorm,会发现同一个人在说自己用phpstorm,问phpstorm有没有什么支持。结果官网说暂时好象不支持。。。
然后再搜索了一下,发现在yii的官网有一个简单的例子在说如何让项目支持yii framework。看了一下,发现,大多数都用过,只有第一点,说是把yiilite.php过滤掉。这个其实很重要了,否则有些变量就会出现提示两次。
OK,来看官网的wiki吧:http://www.yiiframework.com/wiki/92/configuring-phpstorm-ide-for-yii
Code completion
- Exclude yiilite.php from index:
- File → Settings → IDE Settings → File Types.
- yiilite.php to Ignore files and folders.
- Exclude not used directories, specify resources.
- File → Settings → Project settings → Directories.
- Mark framework/cli/views, protected/runtime and assets as excluded.
- Mark website root as resource root.
- Specify path to your PHP.
- File → Settings → Project settings → PHP → PHP Home.
- If your project uses common Yii framework folder you need to include it.
- File → Settings → Project settings → PHP → PHP Home → Add.
- Specify a path to framework directory.
- If you are writing unit tests you can include PHPUnit to get code completion:
- File → Settings → Project settings → PHP → PHP Home → Add.
- Specify a path to PHPUnit.
- Complete code: Ctrl+Space.
- Show method arguments: Ctrl+Q.
Testing
You should install PHPUnit to run unit tests.
- PHPUnit.
- Follow official PHPUnit installation guide.
- In your IDE: Run → Edit configurations.
- Press "+".
- Name: anything.
- Test: depending on what do you want to test select an appropriate option. Specify path.
- Use XML configuration file: specifying path to phpunit.xml. Often it's path_to_your_webroot/protected/tests/phpunit.xml.
- To run tests use SHIFT+F10.
OK,现在这样就可以简单的支持yii framework了。只是phpstorm还是有点小问题,因为提示的时候不会显示phpdoc的信息。纠结,啥时候会有doc的提示呢?
知道的人知道这是什么,不知道的也不知道这是什么

用某人的话说,这种广告词根本让人不知所云,早点开掉算了。。。
这一天,你懂的。

当然,不是我一个人。嗯其实从很久以前,我就不再读书了。所以这里讲的也不是我啦。
今天是小朋友第一天去学校,据说丈母娘一夜没睡好,老婆也是迷迷糊糊,但早上醒来后就打电话给丈母娘说送到学校后就扔在学校里,不要拖拖拉拉,否则反而小朋友会哭的。
中午的时候,老婆就电话我说小朋友几乎没哭,就哇哇两下就没事了。然后还贴了一个小五角星。
说是学校的小朋友们有几个哭的非常厉害。
晚上到家的时候问他怎么样,他说,不错;还说不要外婆带他回家了,要陆老师带他回家。暈倒。
还说,有个小朋友在哭,我们问他你怎么不叫他别哭啊。他说我在玩玩具呀,没空。然后又说,我也哭了。问怎么回事,他说,我想你们了呀。。。
总之一天就这样愉快的过去了,对学校也没有害怕。真是一件令人快乐的事情。希望他能够在学校里过的快乐吧(毕竟第一天就遇到了有人抢他玩具还掰他手指抢玩具,真TMD纠结)