

原文网址:http://valokuva.org/?p=59
原文内容:
Usually images are watermarked using a predefined color (let's say for example "white"). How well does this actually work when you're doing the watermark on a light or even a white image? The answer is simple: not very well.
This example illustrates how to use ImagickPixelIterator to get the average luminosity of the background and chosing text color according to it. I tested this algorithm very briefly and the results seemed positive. There's four example images posted at the end of this post to show why background matters when doing a watermark.
代码:
- <?php
- /* Allowed images */
- $allowed = array( "strawberry.png", "Imagepng" );
- $img = ( isset( $_GET['img'] ) && in_array( $_GET['img'], $allowed ) )
- ? $_GET['img'] : 'strawberry.png';
- /* Read the image in. This image will be watermarked. */
- $image = new Imagick( $img );
- $image->setImageFormat( "png" );
- /* The text to write on the mark */
- $text = "www.valokuva.org";
- /* This object will hold the font properties */
- $draw = new ImagickDraw();
- /* Setting gravity to the center changes the origo
- where annotation coordinates are relative to */
- $draw->setGravity( Imagick::GRAVITY_CENTER );
- /* Use a custom truetype font */
- $draw->setFont( "./WCManoNegraBta.ttf" );
- /* Set the font size */
- $draw->setFontSize( 26 );
- /* Create a new imagick object */
- $im = new imagick();
- /* Get the text properties */
- $properties = $im->queryFontMetrics( $draw, $text );
- /* Region size for the watermark.
- Add some extra space on the sides */
- $watermark['w'] = intval( $properties["textWidth"] + 5 );
- $watermark['h'] = intval( $properties["textHeight"] + 5 );
- /* Create a canvas using the font properties.
- Add some extra space on width and height */
- $im->newImage( $watermark['w'], $watermark['h'],
- new ImagickPixel( "transparent" ) );
- /* Get a region pixel iterator to get the pixels in the watermark area */
- $it = $image->getPixelRegionIterator( 0, 0, $watermark['w'], $watermark['h'] );
- $luminosity = 0;
- $i = 0;
- /* Loop trough rows */
- while( $row = $it->getNextIteratorRow() )
- {
- /* Loop trough each column on the row */
- foreach ( $row as $pixel )
- {
- /* Get HSL values */
- $hsl = $pixel->getHSL();
- $luminosity += $hsl['luminosity'];
- $i++;
- }
- }
- /* If we are closer to white, then use black font and
- the other way around */
- $textColor = ( ( $luminosity / $i )> 5 ) ?
- new ImagickPixel( "black" ) :
- new ImagickPixel( "white" );
- /* Use the same color for the shadow */
- $draw->setFillColor( $textColor );
- /* Use png format */
- $im->setImageFormat( "png" );
- /* Annotate some text on the image */
- $im->annotateImage( $draw, 0, 0, 0, $text );
- /* Clone the canvas to create the shadow */
- $watermark = $im->clone();
- /* Set the image bg color to black. (The color of the shadow) */
- $watermark->setImageBackgroundColor( $textColor );
- /* Create the shadow (You can tweak the parameters
- to produce "different" kind of shadows */
- $watermark->shadowImage( 80, 2, 2, 2 );
- /* Composite the text on the background */
- $watermark->compositeImage( $im, Imagick::COMPOSITE_OVER, 0, 0 );
- /* Composite the watermark on the image to the top left corner */
- $image->compositeImage( $watermark, Imagick::COMPOSITE_OVER, 0, 0 );
- /* Display the results */
- header( "Content-Type: image/png" );
- echo $image;
- ?>
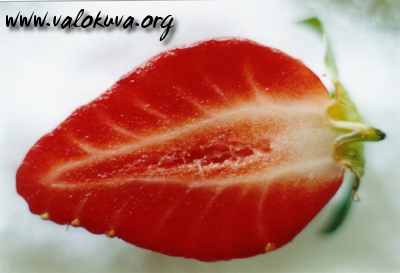
Here is strawberry.png with black watermark (this was chosen by the script):
And here is strawberry.png with white watermark:
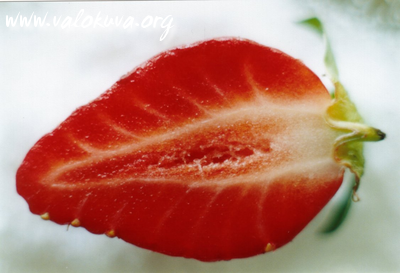
Image32.png with white watermark (this was chosen by the script):
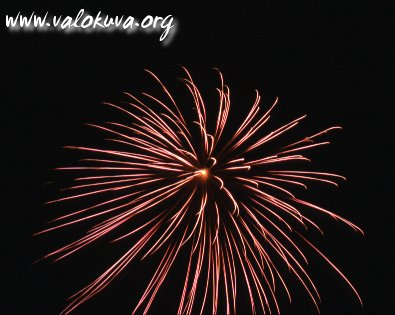
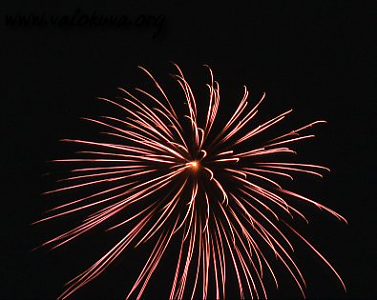
Image32.png with black watermark:
P.S. I opened a new page for the Windows Imagick builds. Seems like my dynamic builds work pretty well, so I will keep providing them thru this site.
--END--
看这个明显可以看出效果比GD好很多,而且代码也没有那么复杂。如果服务器上装了imagemagick扩展,还是用这些比较方便啊